| ART REPRODUCTIONS: FLATBED SCANNING VS. PHOTOGRAPHY
|
 |
| Both scanning and taking photographs of original artwork creates a useful digital copy, which can be used to reproduce a fine art print. It is an important process for artists, to ensure they have a usable, comparable version of their artwork for online and print portfolios, and future print production. Digital copies of artwork come in handy for posters and pamphlets at galleries and museums. A digital image can also be altered in any way the artist or designer chooses, without damage to the original.
Scanners
A flatbed scanner is most often used to photograph two-dimensional artwork. In a professional setting, the base of the scanner may be set into the table around it, to minimize the amount of light allowed in if the piece is large and must be scanned in sections. For pricing see our scan pricing.
Photography
Used to capture digital images of two- and three-dimensional artwork, these photographs are generally taken against a white or neutral background, with natural or studio lighting. Shadows and reflections must be removed so the digital image is clear, and uniform in color.
Below you will find a simplified table summary comparison of these two methods, followed by an in-depth review of certain qualities, as they pertain to each.
|
| SUMMARY |
Scanner |
Photography |
| COLOR |
Will match the original, if scanner is color calibrated
|
Depending on the light, color may need to be altered in an image editor |
| SIZE OF ORIGINAL |
Up to 4 feet by 8 feet, and a depth (with or without frame) of 4 inches. |
No limit, can be done in sections. Large artwork, or pieces that can not be laid on a scanner, such as murals. |
| RESOLUTION |
Will be relatively uniform for each same-size original on the same scanner |
Depends on the quality of the camera and lenses, the focus, and the distance from the original |
| LENS DISTORTION |
Only occurs if the image is not flat in the scanner |
Often occurs and difficult to avoid, but can be fixed in an image editor |
| FILE DPI |
Can be set prior to scanning the image (generally set to 300 or 600 DPI) |
Can be altered in an image editor, but this will shrink the print size (pictures generally taken at 72 DPI) |
| PRINT SIZE |
Most prints scanned at 300 DPI or larger can be reproduced up to twice the size of the original |
Depends on the quality of the photograph, and the camera. A good quality image can be twice the size of the original. |
| PRODUCTION TIME |
A quick set up and immediate result. Multiple takes are generally not required due to consistancy. |
The process takes longer, due to set up time, multiple takes and examination of each digital image to ensure it is of acceptable quality. |
| EQUIPMENT PRICE |
A professional scanner costs $75-$200,000. A smaller, high-quality scanner costs approximately $2,000. |
A professional-quality Digital SLR camera and equipment (lens, lighting) costs between $5,000 and $20,000. |
| SERVICE PRICE |
A small image will cost approximately $50 (the same as a photograph), but prices increase with size.
For pricing see our scan pricing.
|
Professional photographing costs approximately $50 per piece, and up to as much again for editing/color matching.
|
| For more info read our Artwork Scanning FAQs.
|
| COMPARING THE ORIGINAL TO THE DIGITAL: COLOR
|
|
Scanning
Scanning an image can distort colors, or bring make more visible details you preferred not to see. Whites in a scanned image may appear blue or gray, or the texture of the unmarked canvas or paper may be more obvious.
There are two ways to ensure the color of the scanned image matches the color of the original. The first is to edit the original in an image editor such as Photoshop. The difficulty with this method is that it requires your computer monitor to be color calibrated as well, so you can be certain the colors you are seeing are the real colors. Perhaps an easier way, in the long run, is to run a color calibration on the scanner prior to use. If the monitor is calibrated correctly, you can compare the digital image and the original. If not, print the image and compare the print to the original.
When you order a scan from a professional printing company, their scanner will be calibrated, and they will also Color Match your original if you can leave it with them. Following this, you can request a proof, which is a small portion of your image, printed at full size, which will show you the final result, and allow the printer to calibrate further if necessary. Though all these post-scan options will result in a good quality image, it is best to have the scan as close to the correct color as possible, without editing.
Photography
When photographing an artwork, perhaps the most difficult part is to ensure the lighting is correct. The area must be bright enough to properly highlight the image, all its details and variations in color, but any direct light is going to cause shadows in other parts of the image. Natural or studio lighting is the easiest way to achieve this even lighting, and should result in a digital image with the same colors as the original, as long as the camera's white balance is properly set before hand.
LENS DISTORITION
Scanning
With a scanned image, lens distortion is minimal, especially if the entire artwork fits onto the scanner. As long as the image is laid flat, the digital image should appear flat as well. This is because the scanning apparatus within the scanner will run along the entire bed of the machine, recording each part of the image from directly below it. However, if the image to be scanned must remain in the frame, or is on a stiff base that is warped, some distortion is unavoidable. Often, this can be fixed in an image editor by a designer.
Photography
Lens distortion is more common when photographing images, if it is not done correctly. From whatever angle the photograph is taken, parts of the image will be farther away and parts will be closer. This means certain parts of the image will appear larger than others. In order to avoid this, it is best to take the photograph from above, ensuring that the camera is positioned in the very center of the image, and that space is left around the image to allow for any corner distortion. Using a zoom function minimizes distortion as well.
DIGITAL REPRODUCTIONS: SIZE, RESOLUTION AND DPI
Resolution:
The higher the resolution of a digital image, the more detail it can clearly display. Resolution is indicated by the number of pixels out of which the image is made. For instance, an image that is 3200x2600 pixels will be higher resolution than one that is 320x260 pixels. While resolution does not guarantee that a photograph or scanned image is "good", it does generally affect the maximum print size. Generally, the resolution will be pre-determined by the camera or the scanner, depending on brand and quality.
Size: As stated above, the maximum possible print size is partially determined by the resolution, but there are many other factors that affect print size as well. When using a scanner, as long as the scan is of good quality, the maximum size should be relatively uniform, based on the size of the original. At 300 DPI, most digital images can be printed the size of the original, or up to twice that size.
With photographing artwork, however, the size will vary based on the quality of the lens, the distance the camera was from the original, and how in focus it is, in addition to the properties of the camera itself.
Dots Per Inch (DPI): For an ideal printed reproduction, the scanner can be programed to scan the image at 300 or 600 DPI. This setting is determined by the type of printer that is used, as this will affect how many "dots" of ink the printer can spray in a one inch area. Most inkjet printers (used for Giclée prints) print at 300-720 DPI. Digital photographs are generally approxmiately 72 DPI. Though the DPI can be changed to 300 or 600 with editing software, this will severely lower the maximum print size.
|
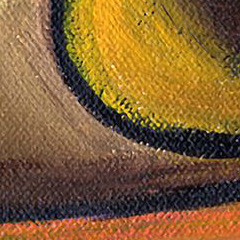
Scanned Image, Acrylic On Canvas
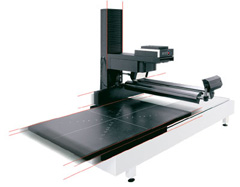
Cruse Scanner

Small Flatbed Scanner
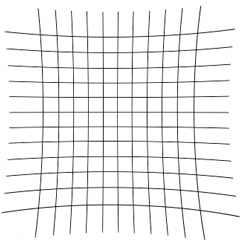 A result of lens distortion. A result of lens distortion.
|
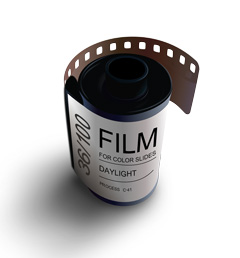
SCANNING FILM NEGATIVES
One capability of scanners over photography is the ability to scan and convert film negatives to digital images.
When a film negative is processed and printed on photo-sensitive paper, it is enlarged to many times its original, 35mm size. This same quality is transferred the digital rendering made from it.
A special slide scanner is required for this process. A holder keeps the negatives in place on the scanner bed, and allows the printer to scan multiple negatives at one time. Once the negative has been cleared of all dust and laid flat, the scanning software records and recognizes the negative, translating it into a positive digital image. Much like a photographic copy of an artwork, possible print sizes will depend on the quality of the scan and the negative itself.
|
Slide can be scanned and digitally altered.
|
| GUIDELINES: PHOTOGRAPHING ARTWORK
|
|
| It is possible to photograph your own artwork using a point-and-shoot or DSLR camera. These guidelines will help you produce a digital copy of your art. It should be noted, however, that photographing your own art is a low-budget solution. Artwork photographed with anything but the highest quality equipment, in the best conditions, is unlikely to produce a high quality reproduction. Rather, this option will provide the artist with an image for their online portfolio, or sample or text prints.
When photographing artwork, the primary goal is to have a digital image that is identical to the original. The image on the computer monitor should not look photocopied or photographed, but simply like a digital reproduction of the piece. If brushstrokes are visible in the original, they should be visible in the digital image. If there is a lot of true white in the original, those areas should be true white (not bluish or grey) in the digital image.
While many of those corrections can be made with image editing software after the picture is taken - and some, like lens distortion, have to be - the photograph should be as close as possible to the original, prior to any retouching.
The Right Light
The best way to achieve a true-color image free of shadows or unwanted highlights is to photograph the original artwork in indirect, natural light (outdoors on a cloudy day, or indoors when the sun is not shining directly through the window). Cameras are built to assume the light is natural, which is why there are different settings for use in artificial light. If taking the photo in natural light is impossible, make sure to select the correct setting, or use a Grey Card to achieve the proper white balance.
Avoid Distortion
As mentioned above, when a photograph is taken from any angle, the parts of the image farther away will appear smaller than the parts close to the lens. It is important to make sure your camera is positioned in front of the piece, in the very center of the image. Step back so there is some space around the artwork - this way, any distortion will affect those edges, which can simply be cropped off. Using a zoom will also help to flatten the image.
Wherever your artwork is set, ensure that the camera is exactly parallel to the image. This means if your artwork is leaning against a wall at a 45 degree angle (not recommended), your camera should be held at a 45 degree angle as well. The best way to ensure your image and your camera are parallel is to lay the artwork on the floor and take the picture from above.
Getting It Right
Take a number of pictures before you move to the computer, and zoom in on the view screen as far as you can, to make sure the details of the original are clear in the digital image. If you have the option, set your focus to all Auto Focus points, to ensure every section of the image will be clear. A tripod is always a good idea, to reduce camera shake.
On The Computer
Once you have an image you are satisfied with, you can do any minor retouching on the computer using an image editor like Photoshop. Simple actions let you correct any lens distortion, change the color balance or fix one particular color that your camera did not get quite right, and crop off that outside edge. If the original was a sketch or drawing, the editor also allows you to remove any smudges or not-quite-erased pencil lines you do not want in the reproduction.
|

|
| Whether you decide to go with photography or scanning, it is important to have a backup, digital copy of all original artwork. If you are an artist who is selling your work, you will want that copy for any future prints, once you have sold the original. If you are a collector, those pictures are important for insurance, and to facilitate sales of the originals. Whatever your intentions for your artwork, protect its financial and sentimental significance with a high-quality digital copy, or printed reproduction.
|
|
© 2002-2026 - KeenART Media Ltd.
|
|
| |
|